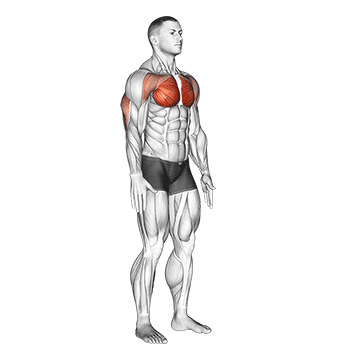
Training your pecs is a crucial part of strengthening and framing your chest. Whether you are a seasoned workout veteran or designing your first training plan, the exercises below will help you meet your fitness goals.
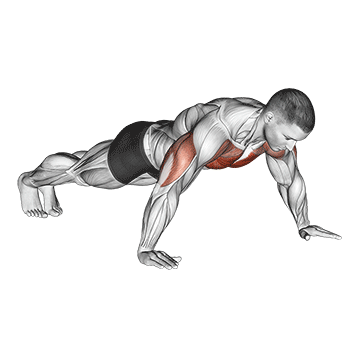
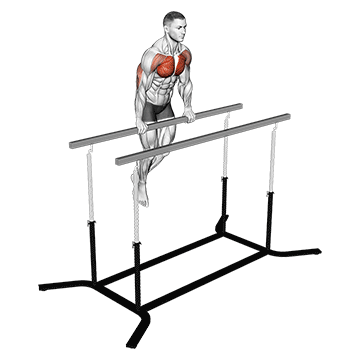
wide-grip chest dip on high parallel bars
1. Approach the high parallel bars and stand between them. Reach up and grasp the bars with a wide grip, wider than shoulder-width apart. This is your starting position.
2. Push off the ground and hoist your body up, straightening your arms and keeping your body upright. Cross your legs at the ankles for stability.
3. Lower your body by bending your elbows, keeping them pointed out to the sides. Continue to lower yourself until your chest is almost touching the bars. Ensure that you feel a stretch in your chest and shoulders.
4. Push your body back up to the starting position by straightening your arms and using your chest muscles to lift your body weight.
5. Repeat this movement for the desired number of repetitions.
Remember to keep your body upright throughout the exercise to target the pecs effectively. Avoid leaning forward as this will shift the focus to the triceps. Also, ensure to control your movement both while lowering and lifting your body to maximize muscle engagement and prevent injury.
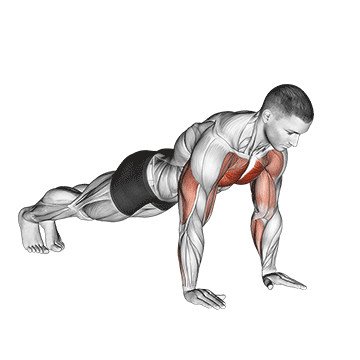
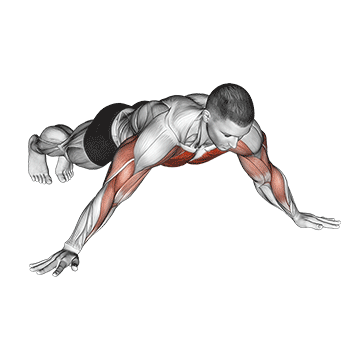
wide hand push up
Begin by finding a flat, open space where you can comfortably extend your body. Position yourself on the floor on your hands and knees.
Spread your hands wider than shoulder-width apart on the floor. Your fingers should be spread out and pointing slightly outward. This is your starting position.
Slowly extend your legs behind you, coming up onto the balls of your feet. Your body should form a straight line from your head to your heels. This is known as a plank position.
Engage your core and lower your body towards the floor, bending your elbows out to the sides. Keep your body straight and rigid, and ensure your hips don't sag.
Once your chest is just above the floor, push your body back up to the starting position while maintaining the straight line and not locking out your elbows.
This completes one repetition. Aim for multiple repetitions and sets depending on your fitness level. Remember to breathe in as you lower your body and breathe out as you push back up.
The wide hand push up primarily targets the pecs, but also works the shoulders and triceps. Ensure to keep your body aligned and controlled throughout the exercise to maximize effectiveness and prevent injury.
suspended push-up
To perform a suspended push-up, you'll need a suspension trainer. Here's how to do it:
1. Start by setting up your suspension trainer. Ensure it's secure and at a height where your hands can reach the handles when you're in a high plank position.
2. Stand facing away from the anchor point, grab the handles, and walk forward until your body is at a slight angle. The further you walk, the harder the exercise will be.
3. Position your hands so they are slightly wider than shoulder-width apart. Your body should form a straight line from your head to your heels.
4. Lower your body towards the floor by bending your elbows, keeping your body straight and your core engaged. Your elbows should form a 90-degree angle at the bottom of the movement.
5. Push your body back up to the starting position by extending your arms. Make sure to keep your body straight and your core engaged throughout the movement.
6. Repeat the exercise for your desired number of repetitions.
Remember to keep your body straight and your core engaged throughout the exercise. This will help to target your pecs and also work your core. Adjust the difficulty of the exercise by changing your body angle - the lower your body angle, the harder the exercise will be.
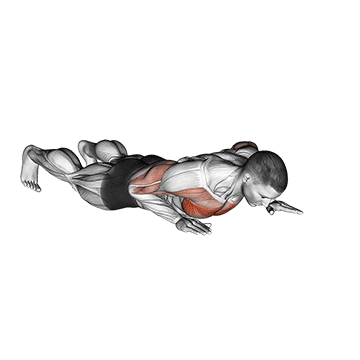
superman push-up
To perform the Superman Push-Up, start by getting into a standard push-up position. Your hands should be slightly wider than shoulder-width apart, and your feet should be set up in a way that feels right and balanced.
Next, lower your body as you would in a regular push-up. As you push back up, use your momentum to lift your hands and feet off the ground. Your body should be in a straight line, parallel to the floor, like Superman flying.
While in the air, extend your arms out in front of you and your legs behind you. This is the "Superman" part of the exercise.
Land back on the ground softly, absorbing the impact with your hands and feet, and immediately lower yourself into the next push-up.
Remember to keep your core engaged throughout the exercise to protect your lower back. Also, make sure to breathe properly. Inhale as you lower your body, and exhale as you push up and lift off the ground.
This exercise is quite advanced and requires a good amount of strength and coordination. If you're a beginner, you might want to start with regular push-ups and gradually work your way up to the Superman Push-Up.
The Superman Push-Up primarily targets the pecs, but it also works the shoulders, triceps, abs, and lower back. It's a great exercise for building upper body strength and improving overall fitness.
single arm push-up
To perform a single arm push-up, start by getting into a standard push-up position. Your hands should be slightly wider than shoulder-width apart and your feet should be set up in a way that feels right and balanced.
Now, move your non-working hand onto the small of your back, balancing your body weight on just one arm and both feet. This is your starting position.
Lower your body towards the floor, keeping your body straight and rigid. Your elbow should be tucked close to your body as you descend.
Push your body away from the floor, extending your arm back to the starting position. Make sure to keep your body straight throughout the movement.
Repeat the exercise for the desired number of repetitions before switching to the other arm.
Remember to engage your core throughout the exercise to help maintain balance and stability. This exercise primarily targets the pecs, but also works the triceps and shoulders.
Please note that the single arm push-up is an advanced exercise and should be attempted only if you can comfortably perform regular push-ups. Always prioritize form over quantity to avoid injury.
shoulder tap push-up
Begin by getting into a high plank position, with your palms flat on the floor, hands shoulder-width apart, shoulders stacked directly above your wrists, legs extended behind you, and your core engaged. This is your starting position.
Lower your body towards the floor by bending your elbows, while keeping your body straight. This is the push-up part of the exercise. Make sure your elbows are tucked close to your body for maximum engagement of the pecs.
Push your body back up to the starting position. Once you're back in the high plank position, lift your right hand off the ground and tap your left shoulder.
Place your right hand back on the ground, then repeat the push-up. After pushing back up to the high plank position, this time lift your left hand off the ground and tap your right shoulder.
That's one rep. Continue alternating shoulder taps after each push-up. Aim for 10-15 reps, or as many as you can do with good form.
Remember to keep your core engaged and your hips as still as possible throughout the exercise. This will help to maintain balance and stability, and also work your abs.
No special equipment is needed for this exercise, just your body weight. However, if you find the exercise too challenging, you can modify it by doing the push-ups on your knees instead of your toes.
raise single arm push-up
To perform the raise single arm push-up, start by getting into a standard push-up position. Your hands should be slightly wider than shoulder-width apart and your feet should be set up in a way that feels right and balanced to you.
Next, shift your weight onto one hand and lift the other off the ground. Extend this arm out in front of you, keeping it parallel to the ground. This is your starting position.
Lower your body towards the ground as you would in a regular push-up, keeping your body straight and your extended arm still. Push your body up again to the starting position.
Remember to keep your core engaged throughout the exercise to maintain balance.
After completing the desired number of reps, switch arms and repeat the exercise.
This exercise primarily targets the pecs, but also works the shoulders and core. As this is a challenging exercise, beginners may want to start with a modified version on their knees.
Remember to always maintain proper form and control during the exercise, rather than aiming for a high number of reps. This will ensure maximum muscle engagement and reduce the risk of injury.
push-up plus
Begin by getting into a standard push-up position. Your hands should be slightly wider than shoulder-width apart and your feet should be set up in a way that feels right and balanced. Your body should form a straight line from your shoulders to your ankles.
Lower your body until your chest nearly touches the floor. As you lower yourself, tuck your elbows, pulling them close to your body, which helps to better engage your pecs.
Push your body back up. But don't stop there. The "plus" in a push-up plus is a scapular push-up. Once you're back in the starting position, continue to push up by rounding your upper back, spreading your shoulder blades apart.
Lower your body back down to the starting position and repeat the exercise.
Remember to keep your core engaged throughout the exercise, and don't let your back sag. This will help to ensure that you're using your pecs, not your back muscles, to do the exercise.
This exercise can be done with just your body weight, but if you want to increase the difficulty, you can add a weight vest or other form of resistance.
push-up (wall) v. 2
Stand facing a wall at an arm's length distance. Place your palms flat against the wall at shoulder height and shoulder-width apart. This is your starting position.
Bend your elbows and begin to lean your body towards the wall. Keep your feet flat on the ground and your body in a straight line from head to heels. Continue leaning in until your nose nearly touches the wall.
Push your body away from the wall by straightening your arms, returning to the starting position. Ensure your body remains straight and your core engaged throughout the movement.
Repeat this process for your desired number of repetitions. This exercise primarily targets your pecs, but also works your shoulders and triceps. Remember to keep your movements slow and controlled to maximize muscle engagement.
push-up (wall)
Stand facing a wall at an arm's length distance. Place your palms flat against the wall at shoulder height and shoulder-width apart.
Bend your elbows and start to lean your body towards the wall. Keep your feet flat on the ground and your body in a straight line from head to heels.
Continue leaning in until your nose almost touches the wall.
Push your body away from the wall by straightening your arms, returning to the starting position.
This completes one repetition. Aim to do a set of 10 to 15 repetitions, ensuring to keep your movements slow and controlled.
Remember to breathe in as you lean into the wall and breathe out as you push yourself back to the starting position.
This exercise targets your pecs but also works your shoulders and triceps. You can adjust the difficulty of the exercise by moving your feet further away from the wall. The further your feet are from the wall, the harder the exercise becomes.
push-up
Begin by positioning yourself face down on the floor, keeping your feet together. Your hands should be slightly wider than shoulder-width apart. This is your starting position.
Push your body up by fully extending your arms, while keeping your body straight. Don't let your back sag or your butt stick out. This is the high plank position.
Lower your body until your chest nearly touches the floor. Keep your body rigid and your elbows close to your body as you lower yourself.
Push your body up back to the high plank position. This completes one repetition.
Remember to breathe in as you lower your body and breathe out as you push yourself up.
Repeat this movement for your desired number of repetitions.
This exercise primarily targets your pectoral muscles, but it also works your triceps and anterior deltoids. No equipment is needed for this exercise, as you are using your own body weight for resistance.
push and pull bodyweight
To perform the push and pull bodyweight exercise, start by standing straight with your feet shoulder-width apart.
Push Phase:
1. Lower your body into a squat position, placing your hands on the ground in front of you.
2. Kick your feet back into a plank position, keeping your body straight from head to heels.
3. Lower your body towards the ground in a push-up motion. Keep your elbows close to your body as you do this.
4. Push your body back up to the plank position.
Pull Phase:
1. Jump your feet forward to your hands, returning to the squat position.
2. Stand up straight, then lift your hands towards the ceiling, pulling your body upwards.
3. Lower your hands back down to your sides, returning to the starting position.
Repeat this exercise for a set number of repetitions. This exercise targets your pecs but also works your arms, shoulders, and core. Remember to keep your movements controlled and your core engaged throughout the exercise.
plyo push up
Begin by getting into a traditional push-up position. Your hands should be slightly wider than shoulder-width apart, and your feet should be hip-width apart. Your body should form a straight line from your head to your heels.
Lower your body until your chest nearly touches the floor. As you lower yourself, keep your elbows close to your body. This will help to engage your pecs more effectively.
Now, instead of pushing up in a controlled manner as you would in a regular push-up, you're going to push up explosively. This means you push up so hard that your hands leave the ground. This is the "plyo" or "plyometric" part of the exercise, which involves explosive movements.
As you land, immediately lower your body back down and prepare for the next rep. Absorb the impact of the landing through your arms, and use this momentum to help you lower your body back down.
Remember to keep your core engaged throughout the exercise, and don't let your back sag or your hips hike up.
Repeat this exercise for the desired number of reps. If you're new to plyo push-ups, start with a small number of reps and gradually increase as your strength and endurance improve.
Remember, the goal of this exercise is to work your pecs, so focus on using them to push your body up. If you find the exercise too challenging, you can modify it by dropping to your knees for the push-up.
modified hindu push-up (male)
1. Start by positioning yourself in a push-up position. Your hands should be shoulder-width apart and your feet hip-width apart. This is your starting position.
2. Now, lift your hips up and back, so your body forms an inverted 'V' shape. Your legs and arms should be straight, and your head should be in line with your arms. This is known as the 'downward dog' position in yoga.
3. From this position, bend your elbows and lower your body in a swooping motion. Your chest should come close to the floor as you push forward. Your hips should be lowered, and your back should be arched with your head looking forward. This position is similar to the 'upward dog' position in yoga.
4. Push back up to the starting position by reversing the swooping motion. This completes one repetition.
5. Repeat this exercise for the desired number of repetitions.
Remember to keep your movements smooth and controlled, and your core engaged throughout the exercise. This exercise not only targets your pecs but also works your shoulders, triceps, and core.
korean dips
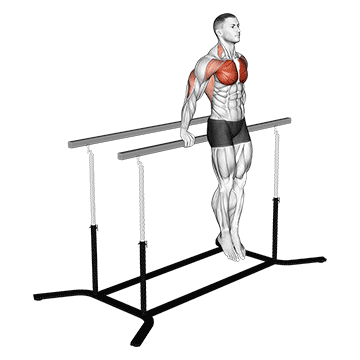
1. Start by finding a sturdy surface that can support your body weight, such as parallel bars or even two sturdy chairs placed side by side. Ensure the surface is at least waist high.
2. Stand between the bars or chairs and grip them firmly with your hands. Your palms should be facing inward.
3. Push off the ground and lift your body up until your arms are fully extended. Your body should be in a straight line from your shoulders to your feet. This is your starting position.
4. Slowly lower your body by bending your elbows. Keep your body close to the bars or chairs and your elbows close to your body. Continue lowering until your chest is level with your hands.
5. Pause for a moment at the bottom of the movement, then push your body back up to the starting position by extending your elbows. Make sure to keep your body straight and avoid using your legs or hips to help lift your body.
6. Repeat this movement for the desired number of repetitions.
Remember to keep your core engaged throughout the exercise to maintain stability and control. Also, ensure to breathe in as you lower your body and breathe out as you push yourself back up. This exercise can be challenging for beginners, so start with a small number of repetitions and gradually increase as your strength improves.
kneeling push-up (male)
1. Start by finding a soft surface like a yoga mat or a carpeted area to protect your knees.
2. Kneel down on the mat and place your hands flat on the ground, shoulder-width apart. Your hands should be positioned slightly wider than your shoulders.
3. Extend your legs behind you and rest your body weight on your knees. Your body should form a straight line from your head to your knees.
4. Lower your body towards the ground by bending your elbows. Keep your elbows close to your body for more emphasis on your triceps, or flare them out to the sides to focus more on your pecs.
5. Continue lowering your body until your chest almost touches the ground. Ensure your body remains straight and your hips don't sag.
6. Push your body back up by straightening your arms, but don't lock your elbows at the top of the movement.
7. Repeat this movement for your desired number of repetitions.
Remember to keep your core engaged throughout the exercise to protect your lower back, and maintain a steady, controlled motion. Don't rush the push-ups; the slower you go, the more muscle tension you'll create, which can lead to greater strength gains.
isometric wipers
To perform the Isometric Wipers exercise, follow these steps:
1. Start by lying flat on your back on a comfortable surface, such as a yoga mat or carpeted floor. Extend your arms out to your sides, forming a T shape with your body. Your palms should be facing down.
2. Bend your knees and lift your feet off the ground until your thighs are perpendicular to the floor. Your knees should be directly above your hips, and your shins should be parallel to the floor. This is your starting position.
3. Engage your pecs and core as you slowly lower both legs to the right side, keeping your knees bent and together. Try to get your knees as close to the floor as possible without touching it. Your upper body and arms should remain flat on the floor throughout the movement.
4. Pause for a moment in this position, maintaining tension in your pecs. Then, using your core and pec muscles, lift your legs back to the starting position.
5. Repeat the movement on the left side, lowering your knees as close to the floor as possible without touching it.
6. Continue alternating sides for the desired number of reps or time duration. Remember to keep your movements slow and controlled, and maintain tension in your pecs throughout the exercise.
This exercise not only targets your pecs but also works your core and improves your stability and flexibility. Remember to breathe normally throughout the exercise and to warm up before starting.
isometric chest squeeze
To perform the isometric chest squeeze, start by standing or sitting upright with your back straight. Extend your arms out in front of you at chest level.
Clasp your hands together, interlocking your fingers. This is your starting position.
Now, push your hands together as hard as you can, as if you're trying to bring your palms closer together. You should feel a contraction in your chest muscles.
Hold this squeeze for about 10-15 seconds, or as long as you can maintain good form. Remember to breathe normally throughout the exercise.
Relax your hands, then repeat the exercise for your desired number of repetitions.
This exercise can be done anywhere and at any time as it requires no equipment, just your body weight. It's a great way to engage and strengthen your pecs.
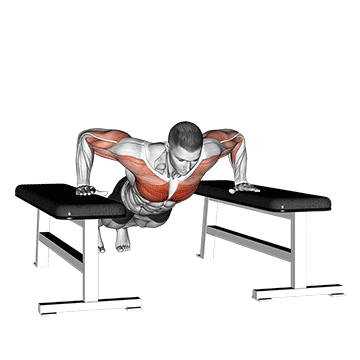
incline reverse grip push-up
To perform the incline reverse grip push-up, start by finding an elevated surface such as a bench, step, or even a wall. The higher the surface, the easier the exercise will be.
Stand facing the elevated surface. Place your hands on the surface slightly wider than shoulder-width apart, but instead of having your fingers point upwards, rotate your hands so your fingers are pointing towards your feet. This is the reverse grip.
Now, step back until your body is at a slight angle. Keep your body straight from your head to your heels. This is your starting position.
Lower your body towards the surface by bending your elbows. Keep your elbows close to your body to engage your pecs more. Continue lowering until your chest nearly touches the surface.
Push your body away from the surface by straightening your elbows, returning to the starting position. Make sure to keep your body straight and your core engaged throughout the movement.
Repeat the exercise for the desired number of repetitions. Remember to breathe in as you lower your body and breathe out as you push yourself back up.
This exercise primarily targets the pecs, but also works the triceps and shoulders. Adjust the height of the surface to increase or decrease the difficulty of the exercise.
incline push-up (on box)
To perform an incline push-up on a box, start by standing in front of the box. The box should be sturdy and high enough to create an incline when you place your hands on it.
1. Stand facing the box, about one to two feet away, depending on the height of the box.
2. Place your hands on the edge of the box, slightly wider than shoulder-width apart.
3. Step back until your body is at a slight incline, keeping your feet hip-width apart. Your body should form a straight line from your head to your heels. This is your starting position.
4. Lower your body towards the box by bending your elbows, keeping your body straight and your elbows close to your body.
5. Push your body back up to the starting position by straightening your arms, using your chest and arm muscles.
6. Repeat this movement for the desired number of repetitions.
Remember to keep your core engaged throughout the exercise to maintain stability and protect your lower back. Also, ensure your chest, not your face or stomach, is moving towards the box.
Incline push-ups on a box are a great way to target your pecs using your body weight. They are also a good option for beginners or those who find regular push-ups too challenging.
incline push-up
To perform an incline push-up, first, find a sturdy elevated surface such as a bench, step, or even a wall. The higher the surface, the easier the exercise will be.
Stand facing the bench. Place your hands on the edge of the bench slightly wider than shoulder-width apart. Step your feet back so you're leaning on an angle into the bench. Your body should form a straight line from your head to your heels. This is your starting position.
Lower your body towards the bench by bending your elbows. Keep your elbows close to your body for more emphasis on your triceps, or flare them out to the sides to focus more on your pecs.
Push your body away from the bench to return to the starting position, extending your arms fully. This is one repetition.
Ensure your core is engaged and your body remains in a straight line throughout the movement to protect your lower back.
Perform the desired number of repetitions. This exercise primarily targets the pecs, but also works the triceps and shoulders. Remember to breathe in as you lower your body, and breathe out as you push yourself back up.
incline push up depth jump
To perform the incline push up depth jump, start by finding a sturdy elevated surface such as a bench, step, or even a wall. The higher the surface, the easier the exercise will be.
1. Stand facing the elevated surface. Place your hands on the surface slightly wider than shoulder-width apart. This is your starting position.
2. Step back until your body is at a slight incline, keeping your feet together. Your body should form a straight line from your head to your heels.
3. Lower your body towards the surface by bending your elbows, keeping your body straight. Continue down until your chest nearly touches the surface.
4. Push your body away from the surface as forcefully as you can, so your hands leave the surface. This is the 'depth jump' part of the exercise.
5. As you land, immediately lower into your next push up.
6. Repeat this process for your desired number of repetitions.
Remember to keep your body straight throughout the exercise and avoid sagging your hips or hiking your butt up. Also, ensure you're pushing off and landing with your hands in a controlled manner to avoid injury. This exercise targets your pecs but also works your shoulders and triceps.
full planche push-up
To perform a full planche push-up, start by warming up your body with some light cardio and stretching exercises. This will help to prevent injury and prepare your muscles for the workout.
1. Begin in a push-up position with your hands slightly wider than shoulder-width apart. Your fingers should be spread wide and pointing forward.
2. Lean forward and lift your feet off the ground, balancing your weight on your hands. Your body should be parallel to the ground in a straight line from your head to your feet. This is the planche position.
3. Lower your body towards the ground by bending your elbows, keeping your body straight and parallel to the ground. Make sure to keep your core engaged and your back straight.
4. Push your body back up to the planche position by straightening your elbows. This completes one rep.
5. Aim to do 3 sets of 5-10 reps, depending on your fitness level.
Remember, the full planche push-up is an advanced exercise that requires a lot of strength and balance. If you're a beginner, you may want to start with easier variations of the push-up and gradually work your way up to the full planche push-up. Always listen to your body and stop if you feel any pain.
dynamic chest stretch (male)
_Chest_360.gif)
1. Stand tall with your feet shoulder-width apart. Keep your back straight and your shoulders relaxed.
2. Extend your arms out to your sides, keeping them at shoulder height. Your palms should be facing forward.
3. Slowly start to swing your arms back and forth in a controlled manner. As you swing your arms back, squeeze your shoulder blades together and feel the stretch in your chest muscles.
4. Continue this swinging motion for about 30 seconds to a minute. Make sure to keep your movements smooth and controlled, and avoid any jerky or rapid motions.
5. After completing the dynamic chest stretch, relax your arms by your sides and shake them out a bit to release any tension.
6. Repeat this exercise for 2-3 sets, taking a short break in between each set.
Remember, the goal of this exercise is to stretch and warm up your chest muscles, not to strain them. So, always keep your movements controlled and within a comfortable range of motion.
drop push up
Begin by standing upright with your feet shoulder-width apart. This is your starting position.
Next, bend at your hips and place your hands on the floor in front of you. Kick your feet back so that you are in a high plank position, with your hands directly under your shoulders and your body forming a straight line from your head to your heels.
Now, lower your body towards the floor by bending your elbows, keeping your body straight. This is the push-up part of the exercise.
Push your body back up to the high plank position.
Finally, jump your feet forward to meet your hands and explosively jump up into the air, reaching your arms above your head.
Land softly and immediately bend at your hips to place your hands on the floor and kick your feet back into the high plank position.
Repeat this sequence for your desired number of repetitions.
Remember to keep your core engaged throughout the exercise and to maintain a straight body line during the push-up. Also, ensure that you land softly from the jump to protect your joints.
This exercise is a drop push-up and it targets your pecs, but it also works your entire body due to the jumping and high plank position. You only need your body weight to perform this exercise.
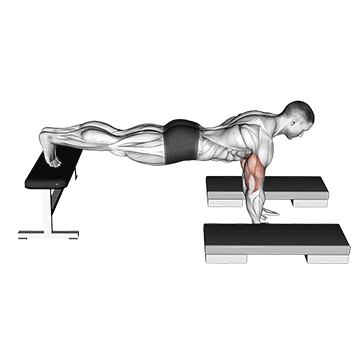
decline push-up
To perform a decline push-up, start by finding a stable elevated surface such as a bench, step, or even a sturdy box. The higher the surface, the more challenging the exercise will be.
1. Position yourself into a high plank position with your hands firmly on the ground, directly under your shoulders. Your feet should be on the elevated surface behind you.
2. Keep your body in a straight line from your head to your heels. This is your starting position.
3. Lower your body towards the ground by bending your elbows while keeping them close to your body.
4. Push your body up, extending your arms back to the starting position. Ensure to keep your body straight throughout the movement.
5. Repeat the movement for your desired number of repetitions.
Remember to engage your core and squeeze your glutes throughout the exercise to help maintain proper form. This exercise primarily targets your pectoral muscles, but also works your shoulders and triceps.
clock push-up
To perform the clock push-up, start by getting into a standard push-up position. Your hands should be slightly wider than shoulder-width apart, and your body should form a straight line from your head to your heels. This is your starting position.
Now, imagine a clock face underneath you. Your head points to 12 o'clock, and your feet point to 6 o'clock. Begin by doing a standard push-up. Lower your body until your chest nearly touches the floor, then push yourself back up to the starting position.
Next, walk your hands and feet to the right, rotating your body until your head points to 1 o'clock and your feet point to 7 o'clock. Perform another push-up in this position.
Continue moving clockwise around the imaginary clock face, doing a push-up at each 'hour'. Once you've completed a push-up at 12 o'clock, you've completed one rep.
Remember to keep your body straight and your core engaged throughout the exercise. Also, ensure your chest goes as close to the floor as possible during each push-up for maximum pec engagement.
This exercise can be challenging, so start with a small number of reps and gradually increase as your strength improves.
clap push up
Begin by getting into a standard push-up position. Your hands should be slightly wider than shoulder-width apart, and your feet should be set up in a way that feels right and balanced to you. Your body should form a straight line from your head to your heels.
Lower your body until your chest nearly touches the floor. As you lower yourself, brace your abs as if you were about to be punched in the gut. This helps to keep your body rigid, and doubles as core training.
Now, push up explosively so your hands leave the floor and you can clap them together before landing. This is the most challenging part of the exercise. It requires power and coordination to execute correctly.
Once you've clapped, land back in the starting position with your hands slightly wider than shoulder-width apart, and immediately begin your next rep.
Remember to keep your body straight throughout the exercise. Don't allow your lower back to sag or your hips to hike upwards during the movement.
Start with a few reps and gradually increase as you build strength and power. This is a high-intensity exercise, so it's important to ensure you're performing it with correct form to avoid injury.
chest tap push-up (male)
1. Start by getting into a standard push-up position. Your hands should be slightly wider than shoulder-width apart, and your feet should be set up in a way that feels right and balanced to you.
2. Keep your body in a straight line from your head to your heels. This is your starting position.
3. Lower your body towards the floor, keeping your elbows close to your body as you do so. Ensure your body remains in a straight line.
4. As you push your body back up to the starting position, lift your right hand off the floor and tap your left chest.
5. Place your right hand back on the floor and lower your body again for the next push-up.
6. This time, as you push your body back up, lift your left hand off the floor and tap your right chest.
7. Place your left hand back on the floor. This completes one rep.
8. Repeat this process for your desired number of repetitions. Remember to keep your body straight throughout the exercise and to control your movements. Don't let your lower back sag or your hips hike upwards.
9. Breathe in as you lower your body, and breathe out as you push your body up and tap your chest.
Remember, the chest tap push-up is a more advanced variation of the standard push-up. If you find it too challenging, you can modify it by dropping to your knees for the push-up portion of the exercise.
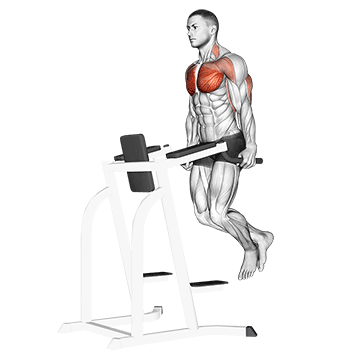
chest dip on straight bar
1. Locate a straight bar that is about chest height. This could be a bar on a dip station, a pull-up bar, or even parallel bars if they're available.
2. Stand in front of the bar and grip it with both hands. Your hands should be slightly wider than shoulder-width apart.
3. Jump or step up to lift your body until your arms are straight and you're holding your body above the bar. This is your starting position.
4. Lower your body by bending your elbows until your chest is just above the bar. Keep your elbows close to your body to target your pecs more effectively.
5. Push your body back up to the starting position by straightening your arms. Ensure to squeeze your chest muscles as you do this.
6. Repeat the movement for your desired number of repetitions.
Remember to keep your body as upright as possible throughout the exercise to target your chest muscles. Leaning forward will engage your triceps more, which isn't the goal of this exercise. Also, avoid using your legs or hips to help lift your body. This should be a controlled movement that relies on your upper body strength.
chest dip (on dip-pull-up cage)
To perform a chest dip on a dip-pull-up cage, follow these steps:
1. Approach the dip-pull-up cage and position yourself between the bars.
2. Grab the bars with a firm grip, palms facing inward. Your hands should be slightly wider than shoulder-width apart.
3. Push yourself up to the starting position. Your arms should be straight but not locked, and your body should be elevated off the ground.
4. Lean your body forward slightly. This will put more emphasis on your pecs.
5. Lower your body by bending your elbows until you feel a slight stretch in your chest. Your elbows should be flared out slightly.
6. Push your body back up to the starting position using your chest and tricep muscles. Remember to exhale as you push up.
7. Repeat the movement for your desired number of repetitions.
Remember to keep your body controlled throughout the exercise, avoiding any swinging or bouncing. Your core should be engaged to help maintain stability. If you're new to this exercise, you may want to have a spotter nearby for safety.
chest dip
To perform a chest dip, start by finding a set of parallel bars. These bars should be slightly wider than your shoulders.
1. Stand between the bars and hold onto each one with a firm grip. Your palms should be facing inward.
2. Push off the ground and straighten your arms to lift your body. Cross your legs at the ankles and bend your knees slightly. This is your starting position.
3. Lower your body by bending your elbows until you feel a slight stretch in your chest. Your body should be leaning forward slightly and your elbows should be flared out slightly.
4. Push your body back up to the starting position by straightening your arms and using your chest muscles to lift your body.
5. Repeat this movement for your desired number of repetitions.
Remember to keep your body controlled throughout the movement. Don't let your body swing or use momentum to lift yourself up. The movement should be slow and controlled for the best results.
Also, ensure to keep your shoulders down and back throughout the exercise to avoid injury. If you feel any pain in your shoulders, stop the exercise immediately.
Chest dips primarily target the pecs, but they also work the triceps and shoulders. They are a great exercise for building strength and muscle in the upper body.
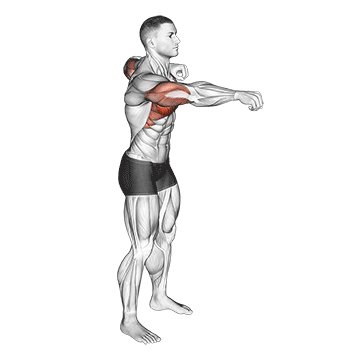
chest and front of shoulder stretch

To perform the chest and front of shoulder stretch, begin by standing tall with your feet hip-width apart. Extend your arms out to your sides, parallel to the floor, with your palms facing forward.
Next, gently pull your shoulder blades together, pushing your chest out and up. You should feel a stretch across your chest and the front of your shoulders.
Hold this position for about 20-30 seconds, breathing deeply and evenly. Make sure not to force the stretch - it should feel comfortable and not cause any pain.
Release the stretch and relax for a moment. Repeat this stretch 3-5 times, or as needed.
Remember to keep your body aligned during the stretch. Your head should be up, your back straight, and your shoulders down and back. This exercise is great for opening up the chest and improving posture, as well as stretching the pecs.
No equipment is needed for this exercise, just your body weight. It can be done anywhere and at any time, making it a convenient way to stretch out your chest and shoulders.
archer push up
To perform the Archer Push Up, start by getting into a standard push-up position. Your hands should be slightly wider than shoulder-width apart, and your body should form a straight line from your head to your heels.
Next, extend one arm out to the side, as if you were drawing a bow. This is where the exercise gets its name. Your other hand should remain under your shoulder, like in a regular push-up.
Lower your body towards the floor, bending the elbow of the arm that's under your shoulder. The extended arm should remain straight, with the palm pressed against the floor. Your body should be leaning towards the side of the bent arm.
Push your body back up to the starting position, keeping your body straight and your extended arm in place.
Repeat the exercise on the other side by switching the positions of your arms.
Remember to keep your core engaged throughout the exercise to maintain balance and stability. This exercise primarily targets the pecs, but also works the arms and core.
As with any exercise, start with a number of repetitions that feels comfortable for you, and gradually increase as your strength improves. No equipment is needed for this exercise, just your body weight.
No tags for this post.